Making framed butterfly art

Written by MK Kids Interiors

On January 29, 2014

You will need:

  1. Paints and ink
  2. Paper
  3. Scissors
  4. Glue
  5. Butterfly Craft Punch
  6. Frames

IMG_0126

Part of our creative consultations are to create artwork with children for their rooms. Firstly we used watercolours to create a subtle orange background.  We cut it to fit over the frame, to form a background.

IMG_0132  IMG_0131

To create the effect on the butterflies, we followed the same procedure of washing the paper with watercolours and ink.

We then folded the paper in half and drew half of the butterfly. We then cut out the butterflies in various sizes.

IMG_0129  IMG_0134  IMG_0127

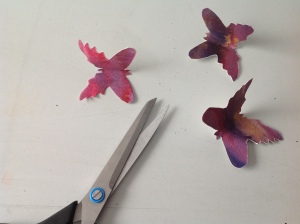
Using glue we stuck the middle (leaving the wings up) of the butterfly to the background we created. Its good to use contrasting colours so the butterflies will stand out from the background.

We also experimented with various sizes. We used a butterfly craft punch to make the small butterflies and as a guide to drawing the larger ones.

We then put the butteries into frames.

IMG_0133

IMG_0137 IMG_0142

Try it with your children. It’s a constructive summer holiday activities.

You May Also Like…

Eat Sleep Doodle!

Eat Sleep Doodle!

 Creative, educational, and endlessly reusable — these clever products from Eat Sleep Doodle are loved by kids and grown-ups alike! Here are three of our favourites: Colour-In Placemats   Make play time more magical with these reusable colour-in placemats!Each...

Easter at The MK Kids Interiors Showroom

Easter at The MK Kids Interiors Showroom

As the days get longer and spring settles in, our Hampstead Garden Suburb showroom is feeling fresh, bright, and ready for the season ahead.                                                                                                                               ...

0 Comments

Submit a Comment

Your email address will not be published. Required fields are marked *

This site uses Akismet to reduce spam. Learn how your comment data is processed.